Look what I just made for zero dollars!

Remember how I bought two lamps from the Salvation Army that looked like this for the DIY mercury glass lamps project:

I bought and covered new shades for the lamps and was all set to toss those old shades when I remembered how expensive new ones can be. The parts to make them aren't easy to come by either, so I cut off the little tops to save for some future project. Seeing the two big rings from the bottoms of the shades gave me another idea...so I saved all of it.

I decided yesterday to put that idea I mentioned into action. I cut the fabric off of one of the large lampshade rings and strung the smaller ring right in the center of it using some white electrical wire (what we had on hand). I ran three pieces of wire around both rings, twisting each wire back on itself a few times at each end and then cutting with wire cutters.

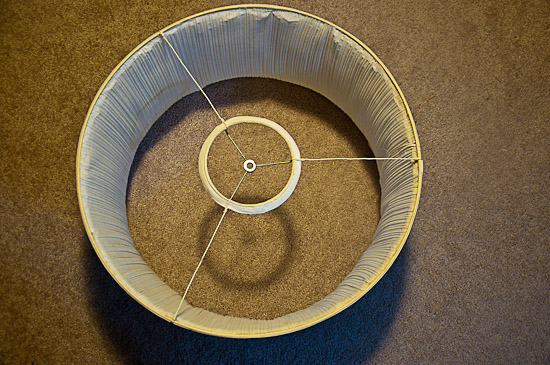
As you can see above and below, I attached the fabric that was still on the other ring to the inside of the one with the wire using a hot glue gun.
The fabric bent in dramatically in the middle until I took the clothes steamer to it.
Now I have a 24" drum shade, a product that can easily cost upwards of $100, to hang in my kitchen on top of this guy:

I think that's what I'm going to do, anyway. The fixture above looked like this when we moved in:
 |
| Turns out this brass luxury can still be yours for a mere $90 at Home Depot. |
Obviously I spray painted it black way back when we moved in. Just a couple of weeks ago I was wishing I could update the fixture again by simply turning those little arms up and adding new sconces. So I tried, and I could. Just that simple. I swapped the sconces out for three I had in my bathroom and bought just two more at Home Depot--a $10 update.
 |
| When I took this peaceful looking picture, there were two balloon-chasing lovebugs scurrying around the kitchen listening to that record on the player. I had to take the picture quickly between scrurries! Funny how quiet it looks. |
So that's what the light looks like at this very moment. While I'm happy with the third look I've squeezed out of this fixture and enjoy the visual interest that the black scrolling arms and crisp white sconces add to the room, I think a large drum shade would better lend itself to the simple, mid-centruy modern look I'm trying to incorporate...which is the thought that made me break out the glue gun last night.
We'll put my new shade up tonight and be one step closer to a finished fix-up!
If you're interested in making your own drum shade but don't happen to have two enormous throw-away lampshades sitting around, I suggest you try this tutorial by Ashley Keylor at The Keylor Family. I just stumbled on it while looking up prices for large drum shades for this post. Most tutorials I found via Pinterest and Google in the past were for covering existing drum shades, but this one is really about how to make one from scratch with materials from Hobby Lobby!


Wow, Carrie. I'm totally befuddled how you turned two lamp shades into one. Great project!
ReplyDeleteThanks, Katie. I couldn't believe how easy it was. And free!
DeleteI have that awesome brass number in my kitchen right now! Just haven't had the time to paint it quite yet. I was planning on switching out the sconces but didn't realize you could turn it upside down! I can't decide on the color yet (silver? dark?) so until then...the project sits.
ReplyDeleteI love the idea of reusing/repurposing things. Too much of our stuff (as a society) goes right in the trash pile without a second thought.