Showing posts with label Kitchen. Show all posts

Monday, November 25, 2013

Phase One: Before and Afters

One of the things that drew us to our new house is its not-so-badness.  We know it will feel pretty comfortable until we are able afford to take on the heftier projects, and in the meantime it has some nice, neutral features and the potential to be lovelier with some quicker fixes. For example it came with...

Untitled

...white cabinets that are in great shape, including some uppers with glass doors and a wine rack...

Untitled

...big windows with a view of a grassy hill and trees...

Untitled

...an island with storage, electricity, and space for my little chefs-in-training...

WP_20131014_004

...all open to a family room with a fireplace.

And here's how those spaces look today!

Housewarming-6

In addition to painting (Benjamin Moore Revere Pewter color matched by Valspar again), Mike replaced the brass knobs, handles, and hinges in the kitchen and hallways.  

Housewarming-3-2

New appliances freshened things up quite a bit.  I love the oil-rubbed bronze doorknobs that we added throughout the house, but I'm considering switching again to nickel drawer and cabinet pulls for down the road when we update floors and counter tops in the kitchen, but that's a ways away.  Right now I think the dark ones add some necessary warmth and contrast.

Housewarming-2-2

Housewarming-1-2

Housewarming-8

The family room lamp and kitchen pendant are from Ikea.  The drum shade you might recall from the old place.

Housewarming-7

As much as I look forward to updates to our fireplace facade and so on, I'm finding myself much more patient about improvements with this second house than I was with the first.  We'll get there!

Housewarming-5

This is my favorite view right now, the one I see when crashing on the couch after a long month of settling in!

Monday, September 3, 2012

Our Reality Kitchen


Like the unofficial summer, our kitchen facelift project lasted roughly from Memorial Day until Labor Day this year.  Part of preparing for my dad's party last weekend included wrapping up this adventure.
 
If you would like some background on this project, you can find out more in previous posts.


The table was my grandparents' kitchen table for decades, and while the sentimentality and vintage look are ideal, our chairs don't fit beneath it.  On the sides pictured without chairs, the legs are too close together for our chairs to go between them, a bit of information we discovered after bringing it home from my parents' house and after Mike painted it. The table does have two leaves, but it opens in the other direction.  It will do for now, but I'll be keeping my eyes open for a larger pedestal table, an option I considered before settling on using this one anyway.


This is the clock from Home Goods that I mentioned before.  With the color of the wood, the black details, and the mid-century modern look complete with that typeface I adore, I don't regret the $40 splurge at all.


Mike darkened the cabinets with General Finishes Gel Stain in Java.  The change might not be an obvious one to some, but it's a very satisfying improvement to us.  I think it helps blend our black appliances in while the new cabinet and drawer pulls highight the stainless steel we do have.
 
 
Here are a couple of before photos for comparison's sake:
 
 
After:


The window shade is a Target tablecloth I found on a clearance rack ($9) that I glued to a roller shade ($8) with spray adhesive.  I saw the idea on Pinterest but didn't really follow any instructions.  I just cut the cloth, sprayed it with 3M spray adhesive, and rolled it back up.  Maybe I should dig out that pin for more advice because it doesn't work great.  I think it might be too heavy for the cheapo roller as it needs to be taken down and manually rolled up sometimes.  Still, it serves its purpose.  It keeps the afternoon sun out of my eyes when cooking and adds some color.  I don't fuss with it much anyway.


You can see the cabinet color is still on the reddish side in the light.

 
In addition to tiling the floor, staining the cabinets, and painting the walls, Mike installed all new floor and crown molding.  The previous owners' work was not of the best quality, and it had been bugging Mike for years.
 
More floor details:


This kitchen isn't our dream kitchen, but for our reality kitchen, I think it's pretty darn nice.
 
 Now, what to do this fall....


Friday, August 3, 2012

DIY Drum Shade for Pendant Fixture

Look what I just made for zero dollars!


Remember how I bought two lamps from the Salvation Army that looked like this for the DIY mercury glass lamps project:


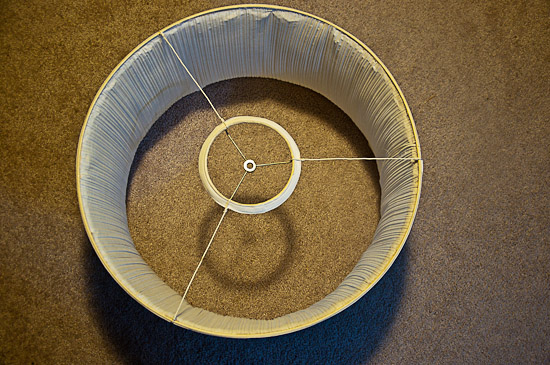
I bought and covered new shades for the lamps and was all set to toss those old shades when I remembered how expensive new ones can be.  The parts to make them aren't easy to come by either,  so I cut off the little tops to save for some future project.  Seeing the two big rings from the bottoms of the shades gave me another idea...so I saved all of it.


I decided yesterday to put that idea I mentioned into action.  I cut the fabric off of one of the large lampshade rings and strung the smaller ring right in the center of it using some white electrical wire (what we had on hand).  I ran three pieces of wire around both rings, twisting each wire back on itself a few times at each end and then cutting with wire cutters.


As you can see above and below, I attached the fabric that was still on the other ring to the inside of the one with the wire using a hot glue gun.  

The fabric bent in dramatically in the middle until I took the clothes steamer to it.  


Now I have a 24" drum shade, a product that can easily cost upwards of $100,  to hang in my kitchen on top of this guy:


I think that's what I'm going to do, anyway.  The fixture above looked like this when we moved in:

Turns out this brass luxury can still be yours for a mere $90 at Home Depot.

Obviously I spray painted it black way back when we moved in.  Just a couple of weeks ago I was wishing I could update the fixture again by simply turning those little arms up and adding new sconces.  So I tried, and I could.  Just that simple.  I swapped the sconces out for three I had in my bathroom and bought just two more at Home Depot--a $10 update.


When I took this peaceful looking picture, there were two balloon-chasing lovebugs scurrying around the kitchen listening to that record on the player.  I had to take the picture quickly between scrurries!  Funny how quiet it looks.

So that's what the light looks like at this very moment.  While I'm happy with the third look I've squeezed out of this fixture and enjoy the visual interest that the black scrolling arms and crisp white sconces add to the room, I think a large drum shade would better lend itself to the simple, mid-centruy modern look I'm trying to incorporate...which is the thought that made me break out the glue gun last night. 

We'll put my new shade up tonight and be one step closer to a finished fix-up!

If you're interested in making your own drum shade but don't happen to have two enormous throw-away lampshades sitting around, I suggest you try this tutorial by Ashley Keylor at The Keylor Family.  I just stumbled on it while looking up prices for large drum shades for this post.  Most tutorials I found via Pinterest and Google in the past were for covering existing drum shades, but this one is really about how to make one from scratch with materials from Hobby Lobby!


Tuesday, July 3, 2012

Freshened Pantry

Back in March I tackled reorganizing the pantry. Now that the fix-up is underway, I asked Mike to give the pantry a new coat of paint, and I added some DIY basket labels for our produce and bread baskets, freshening up the pantry nicely.


I hunted around my Michael's craft store to see if they had chalkboard basket labels like the $8 ones available from Pottery Barn. They didn't, so I bought some small wooden boards ($3 for four), cut some chalkboard vinyl that I already had from the pantry jars, had Mike drill a two small holes at the top of both (I could handle that, but he's faster at it), and threaded some wire through.

I also bought a white fabric-marking pencil to use for all those chalkboard labels. It's much easer to write with than chalk (although I should be skilled at that, right? I'm not) and wipes off easily with a wet paper towel.
Fresh Paint

The pantry today!


A Bowl Full of Lemons

Sunday, July 1, 2012

I can't stay out of my kitchen.

The other night the kids were in bed, Mike was busy in the basement, and I was trying to relax on the living room couch, but I kept going back out to the kitchen.

Can you guess why?


I couldn't stop looking at the practice door Mike has been working on with the gel stain!  I'm so excited!

In case it's not obvious, the practice door is leaning against the refrigerator in the picture above.  The left side has two thin coats of General Finishes gel stain in java, the right has three, and both have one coat of General Finishes gel top coat.  We're going with three coats of gel stain (with two coats of top coat), and I'm tempted to say go four.  I'm loving the richness!  The thin strip down the middle is the original color--so light and orangey in comparison.  Eeew.

For their part, the kids have broken in the kitchen floor, given it a good durabiltiy test with trucks and blocks and even a lap or two around in my heels.  The entry closet where I keep my shoes has no door at the moment, so it was only a matter of time.


Read on for the rambing thoughts behind my design choices...

Like this inspiration kitchen on www.decorpad.com from Toronto Interior Design Group, the look I have in mind for our kitchen fix-up includes grey walls, espresso cabinets, light countertops, and a light colored tile floor. Here's why:
  • Our home ownership circumstances are the greatest influence (home value below what we owe, likely renting out in a year or so, currently saving for a down payment).
  • We've chosen to work with what we have as much as possible while making the house appealing and durable for renters. This is all in the hopes of maximizing what we can ask for rent, getting renters in here quickly, and saving us from having to make updates later when we have a new house on our hands. However, this is also all without draining too much of our down payment savings.
  • Doing nothing is an option, but I know I wouldn't want to rent a house with a discolored and damaged kitchen floor, and I want reliable, respectful renters like I was.
  • Porcelain tile is a durable, affordable flooring choice. We seriously considered cork as well but felt the tile would be more universally appealing to renters and buyers down the road.  And if we're doing the floor...
  • I've wanted a grey room for about a decade now. I've offered numerous versions of the color as a choice to Mike for every room he's painted in this house (which is all of them at least once), but he has always prefered one of the other options. This time, I didn't lay out options. I wanted grey. He was cool with that.
  • The countertops are already beige. While I would love an upgrade, these neutral countertops that are in perfectly good shape remain. I'll save my white marble and butcher block dreams for another home.
  • While I'll admit to scouring Craigslist and our Sears appliance outlet (via website) for a deal we can't refuse, Mike and I are sticking with our mix of black and stainless steel appliances.  It's not ideal, but the appliances are in full working order, and this isn't meant to be anyone's dream home. 
  • Our cabinets need to look good with those existing countertops and appliances. With them in mind, I considered three main options for our cabinets: keep them cherry, paint them white, or gel stain them darker.
  • The current cabinet color is looking a little flat and faded these days.  As much as I'd love that clean look of white painted cabinets, I've been lured by the look of espresso cabinets with beige counters. The contrast is appealing, making the cabinets look rich and the counters creamy--makes me want some chocolate mousse. I'm also hoping that darker cabinets will work better with our black stove, microwave, and dishwasher, kind of like this kitchen from Chatting at the Sky. So gel stain it is! If I hate it, we can always paint the cabinets white later, but the reverse is not possible.
I would love to add more personal style, take more risks, and just play a little more with our kitchen choices, but again, with renting out on the horizon, we have to play it fairly safe to save ourselves work in the future. For that reason, I'm going to have some fun with the less permanent aspects of our kitchen. I'm looking forward to sharing those ideas later on!

Bloggers love comments!

If you stop by for a visit, please leave a note. I would love to know who's checking in on us!